Get Started
Install CumulusCI
Tip
These installation instructions assume some familiarity with entering commands into a terminal. If that’s completely new to you, we recommend visiting the CumulusCI Setup module on Trailhead for a step-by-step walkthrough.
On macOS
Homebrew is a prerequisite for installing CumulusCI on macOS. Follow the instructions on the Homebrew website to install Homebrew before continuing.
Install via pipx
pipx ensures that CumulusCI and its dependencies are installed into
their own Python environment separate from other Python software on your
computer. We cannot recommend it enough!
First, install pipx with these commands:
$ brew install pipx
$ pipx ensurepath
After pipx installs, install CumulusCI:
$ pipx install cumulusci
Note
Upgrading Homebrew’s Python version can result in a bad interpreter error. To resolve this, run pipx reinstall cumulusci.
When finished, verify your installation.
On Linux
Install via pipx
pipx ensures that CumulusCI and its dependencies are installed into
their own Python environment separate from other Python software on your
computer. We cannot recommend it enough!
Installation instructions for pipx can be found
here.
After pipx installs, install CumulusCI:
$ pipx install cumulusci
When finished, verify your installation.
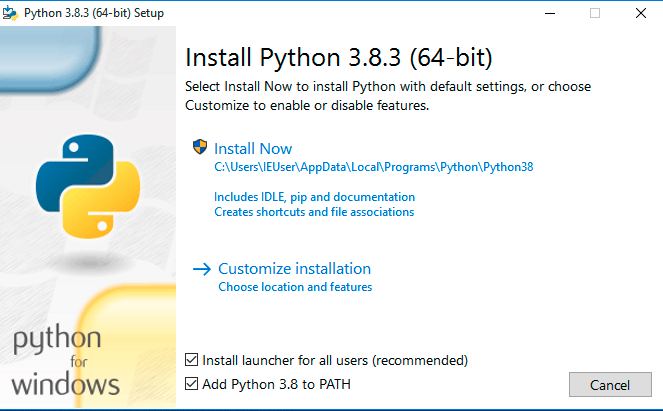
On Windows
Install Python 3
Go to the Python downloads page.
Download the latest Python 3.9 release. Most users select the “Windows Installer (64-bit)” link, but it depends on your particular computer setup.
Install using the installation wizard.
Select Add Python <version> to PATH.
Click “Install Now”.
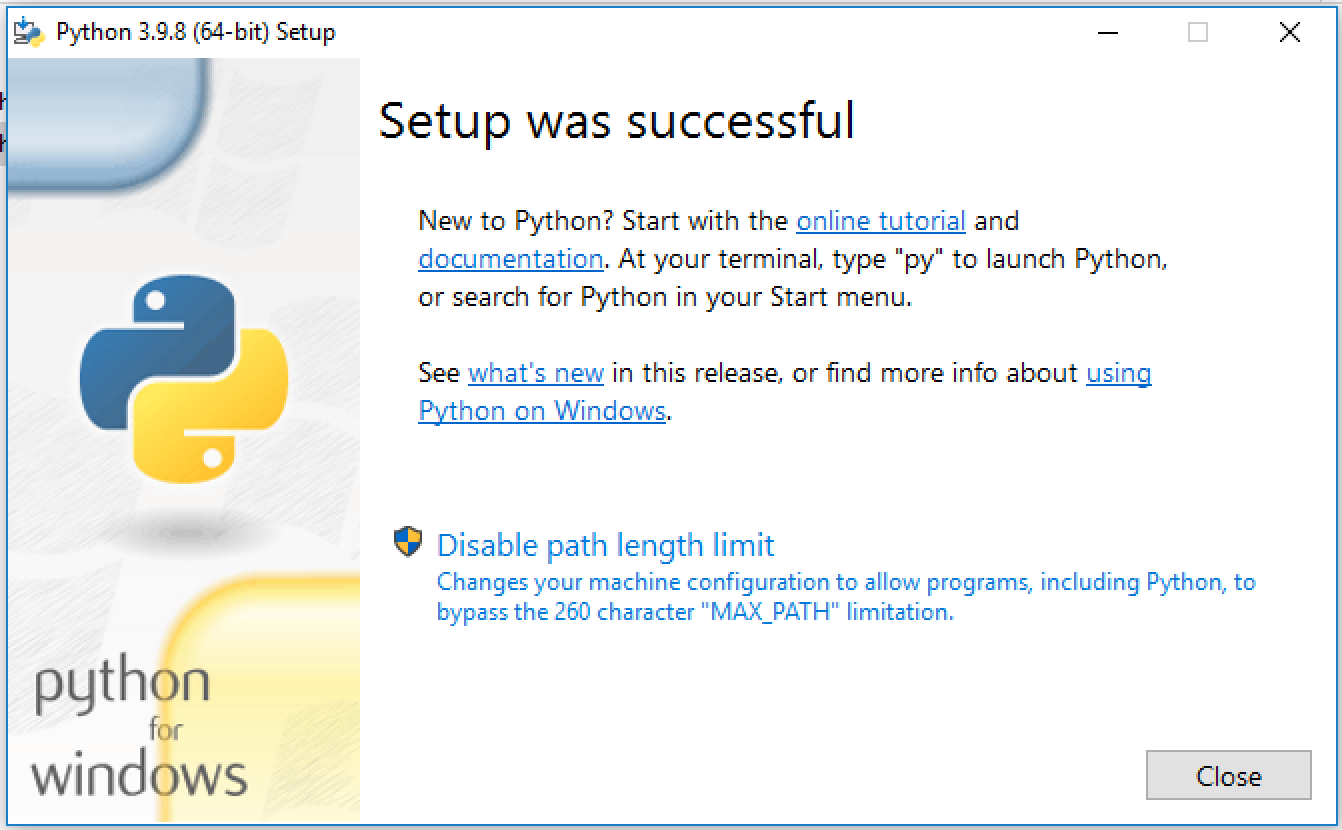
On the screen entitled “Setup was successful,” click the “Disable path length limit” button (if it’s present).
Install via pipx
pipx ensures that CumulusCI and its dependencies are installed into
their own Python environment separate from other Python software on your
computer. We cannot recommend it enough!
Open your preferred terminal application (such as cmd.exe on Windows). If your terminal is already open, close it and reopen it. Enter the following commands:
$ python -m pip install --user pipx
$ python -m pipx ensurepath
Close your current command prompt and open a new one to verify that pipx was successfully installed:
pipx --version
Look for a version number after entering this command, such as:
0.12.3.1.
If you encounter an error, such as
'pipx' is not recognized as an internal or external command, operable program or batch file.,
you can try updating your environment variables manually.
Finally, install CumulusCI with this command:
pipx install cumulusci
When finished, verify your installation.
Update Environment Variables Manually
Click Start and search for
edit environment variables, or open System properties and clickAdvanced system settings.Click the
Environment Variablesbutton.To change System variables, you need non-restricted access (administrator rights) to your machine. Add these paths to your PATH environment variable:
%USERPROFILE%\.local\bin%USERPROFILE%\AppData\Roaming\Python\Python38\Scripts
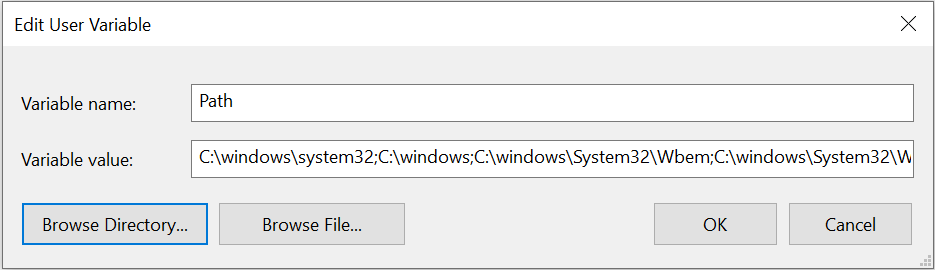
Note
Be precise when entering these paths. Add them at the very end of the Variable Value already in place. Separate each path by a semicolon (;) with no space between path names.
Verify Your Installation
In a new terminal window, verify that CumulusCI installed correctly by
running cci version.
$ cci version
CumulusCI version: 3.29.0 (/path/to/bin/cci)
Python version: 3.8.5 (/path/to/bin/python)

You have the latest version of CumulusCI.
You can also use this command to check whether your CumulusCI installation is up to date.
Still need help? Feel free to submit a question on our Trailblazer community group.
Set Up SFDX
Scratch orgs created by Salesforce DX allow teams to work efficiently in individual, fully-configured environments that are easy to create and destroy. We recommend working with scratch orgs throughout the development process.
To set up Salesforce DX:
Connect SFDX to Your Dev Hub Org - Be sure to use the
--set-default-dev-huboption!
If you have the sf command installed, are connected to your Dev Hub,
and set the target-dev-hub config setting (use
sf config list to verify), you’re now ready to use cci with
sf to build scratch orgs.
Important
SFDX supports multiple Dev Hubs, so CumulusCI uses the one set as
defaultdevhubusername when creating scratch orgs.
Tip
For a detailed introduction on how to set up Salesforce CLI and Visual Studio Code to work with CumulusCI, review the Build Applications with CumulusCI module on Trailhead.
Learn more about Salesforce DX at https://developer.salesforce.com/platform/dx.
Connect to GitHub
In order to allow CumulusCI to work with your repositories in GitHub,
connect GitHub as a service in cci. Simply run:
$ cci service connect github mygithub
to open a browser and authenticate with your GitHub account using the
one-time code shown by the CLI. Verify the GitHub service is connected
by running cci service list:
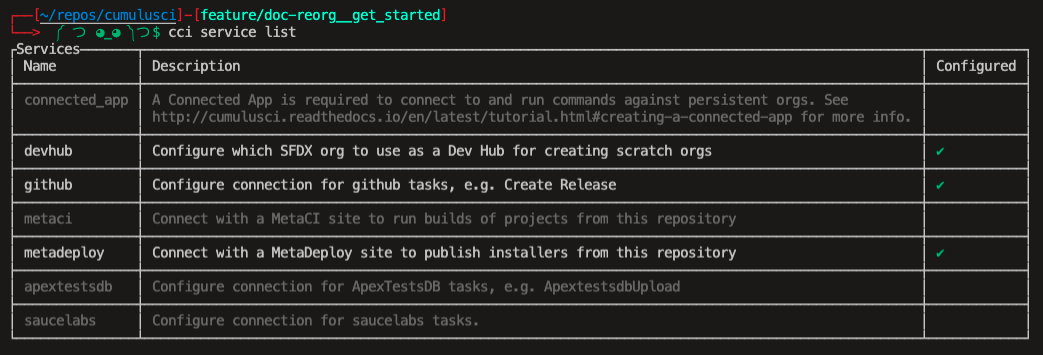
After you’ve configured the github service, it’s available to all
CumulusCI projects.
Note
If your GitHub organization has enabled OAuth App access restrictions, CumulusCI will not be able to access organization repositories until it has been approved by an owner. You can use a personal access token instead.
Alternatively, you may create a new personal access token with both repo and gist scopes specified. (Scopes appear as checkboxes when creating the personal access token in GitHub.) Copy the access token to use when configuring the GitHub service.
Next, run the following command and provide your GitHub username and access token:
$ cci service connect github mygithub --username $GITHUB_USERNAME --token $GITHUB_TOKEN
Services are stored in the global CumulusCI keychain by default.
GitHub Enterprise Server Support
GitHub Enterprise Server Support is an experimental feature that may change.
As of CumulusCI version 3.66, a new GitHub service type is available named github_enterprise to allow connections to a GitHub Enterprise Server (GES). The github_enterprise service works like the github service but includes a server_domain field that must be supplied with the GES server domain.
In some cases, you may receive an error connecting to a GitHub Enterprise Server that states “a self-signed certificate is in the chain”. This may happen when you need to validate server TLS certificates using the system’s certificate authorities, instead of the set of CA certs that is bundled with requests. You may need to set a ENV variable CUMULUSCI_SYSTEM_CERTS to “True”. See CUMULUSCI_SYSTEM_CERTS.
Here’s an example command to configure a github_enterprise service:
$ cci service connect github_enterprise enterprise --token <access token> --username <username> --email <email> --server_domain <repo url>
Limitations of GitHub Enterprise Server Support
The GitHub Enterprise Server service only allows one github_enterprise service to be configured per server domain. This means the access token you are using must have permission to access all required resources at a given repository location.
Work On an Existing CumulusCI Project
If you’d like to work on an existing CumulusCI project on GitHub, these are the prerequisites.
Note
CumulusCI does not support projects stored on other Git hosts such as BitBucket or GitLab at this time.
You can change directories into the project’s root directory and begin
executing cci commands.
For example, cci project info shows information about the project:
$ cd cumulusci-test

$ cci project info
name: CumulusCI Test
package:
    name: CumulusCI Test
    name_managed: None
    namespace: ccitest
    install_class: None
    uninstall_class: None
    api_version: 33.0
git:
    default_branch: main
    prefix_feature: feature/
    prefix_beta: beta/
    prefix_release: release/
    release_notes:
        parsers:
            1:
                class_path: cumulusci.tasks.release_notes.parser.GithubLinesParser
                title: Critical Changes
            2:
                class_path: cumulusci.tasks.release_notes.parser.GithubLinesParser
                title: Changes
            3:
                class_path: cumulusci.tasks.release_notes.parser.GithubIssuesParser
                title: Issues Closed
            4:
                class_path: cumulusci.tasks.release_notes.parser.GithubLinesParser
                title: New Metadata
            5:
                class_path: cumulusci.tasks.release_notes.parser.GithubLinesParser
                title: Deleted Metadata
    repo_url: https://github.com/SFDO-Tooling/CumulusCI-Test
test:
    name_match: %_TEST%
Start a New CumulusCI Project
If you’d like to start a new CumulusCI project, these are the prerequisites.
Run the following commands to create a directory with your project’s name, navigate to said directory, and initialize it as a Git repository:
$ mkdir cci_project
$ cd cci_project
$ git init
Then, initialize the project as a CumulusCI project.
Project Initialization
Use the cci project init command within a Git repository to generate
the initial version of a project’s cumulusci.yml file. CumulusCI
creates a customized cumulusci.yml file by first asking questions
about your project.
Prompt |
What’s it for? |
|---|---|
Project Info |
The name is usually the same as your repository name. |
Package Name |
CumulusCI uses an unmanaged package as a container for your project’s metadata. |
Is this a managed package project? |
Yes, if this project is a managed package. |
Salesforce API Version |
Which Salesforce API version does your project use? Defaults to the latest API version. |
Which source format do you want to use? [sfdx | mdapi] |
DX source format (aka “SFDX Format”) stores data under the |
Are you extending another CumulusCI project such as NPSP or EDA? |
CumulusCI makes it easy to build extensions of other projects |
Default Branch |
Your project’s main/master branch in GitHub. Defaults to the branch that is currently checked out in your local repository. |
Feature Branch Prefix |
Your project’s feature branch prefix (if any). Defaults to |
Beta Tag Prefix |
Your project’s beta branch prefix (if any). Defaults to |
Release Tag Prefix |
Your project’s release branch prefix (if any). Defaults to |
Test Name Match |
The CumulusCI Apex test runner uses a SOQL |
Do you want to check Apex code coverage when tests are run? |
If yes, checks Apex code coverage when tests are run. |
Minimum code coverage percentage |
Sets the minimum allowed code coverage percentage for your project. |
Verify Project Initialization
Verify successful project initialization by verifying that
cumulusci.yml exists and has contents.
$ cat cumulusci.yml
project:
    name: SampleProjectName
    package:
        name: SamplePackageName
        namespace: sampleNamespace
    .
    .
    .
The cumulusci.yml file configures your project-specific tasks, flows,
and customizations.
Once you’re satisfied, add and commit it to your Git repository.
$ git add cumulusci.yml
$ git commit -m "Initialized CumulusCI Configuration"
Add Your Repo to GitHub
With your cumulusci.yml file committed, create a repository on GitHub
for your new project and push your changes there, using whichever method
you prefer.
Our Community Project Development with CumulusCI module covers GitHub Desktop in the “Set Up the Project” section.
If you prefer the command line, GitHub has excellent guides on both git remote and git push.
Convert an Existing Salesforce Project
Converting an existing Salesforce project to use CumulusCI can follow a number of different paths, depending on whether you’re practicing the Org Development Model or the Package Development Model; whether or not you’re already developing in scratch orgs; and the complexity of your project’s dependencies on the org environment.
If you’re developing in persistent orgs and not already using source control, you’ll also need to retrieve the existing metadata from the org. Note that the processes of adopting source control and moving from persistent orgs to scratch orgs tend to look different for everyone, and these transitions sometimes require additional work.
You’re welcome to discuss project conversion in the CumulusCI (CCI) Trailblazer group.
Project Setup
Before retrieving your project’s metadata, set up the project’s root directory.
Create a project directory and initialize it as a Git repository as outlined in start a new CumulusCI project.
Initialize the directory as a CumulusCI project as outlined in project initialization.
Retrieve Metadata from the Persistent Org
This documentation assumes that your project currently lives in a persistent org, such as a Developer Edition org or a Sandbox. We recommend retrieving metadata via the Metadata API (using the Salesforce CLI), followed by converting the source from Metadata API to SFDX format.
If the metadata you want to retrieve isn’t already in a package, create one. See creating packages for more info.
Note
If your project contains a managed package, ensure that the
package namespace matches the namespace you entered when running
cci project init.
Run the retrieve command to extract your package metadata.
$ sf project retrieve start -n package_name /path/to/project/
That’s it! You now have all of the metadata you care about in a single Git repository configured for use with CumulusCI. At this point add your repo to GitHub, or perhaps begin to configure CumulusCI.
Setup Scratch Orgs
To see how to use scratch orgs with CumulusCI see the Manage Scratch Orgs section.
Other Conversion Considerations
If you or your team have been working with scratch org definition files for use with
sfdx, see Manage Scratch Orgs for details on using them with CumulusCI.If you have metadata that you would like deployed pre- or post-deployment, see Roles of Unpackaged Metadata.
If you have data that you need to include for testing or production purposes, see Automate Data Operations.