Acceptance Testing with Robot Framework
CumulusCI comes with a testing framework called Robot Framework (or just Robot), which is specifically for writing acceptance tests. These are typically end-to-end tests that verify that the high-level requirements of a project have been satisfied. (Think “Add a new student and verify they have been assigned a mentor” or “Create a case plan when the student is not enrolled in a program”.) Usually, this involves automating a browser session with Salesforce, but Robot can also be used to test new APIs created by your team.
Later sections of this document will show you how to write tests, call APIs, create custom keywords, and so on. But first there’s a bit of manual configuration to do.
Get Started
The test that comes with CumulusCI opens a browser and performs some automation. For that to work, you need to install Chrome, and a driver for your specific version of Chrome. We don’t ship this driver by default because browser versions are continually updating, and different platforms require different drivers.
If you don’t already have Chrome on your machine, download and install
it in the default location, and then download the appropriate driver
from the chromedriver download
page. Download the latest
stable version that corresponds to your Chrome version, and place it
where Robot can find it. This usually means /usr/local/bin for Linux
and OSX-based systems. (It can go anywhere as long as it’s on your
PATH.)
For more information, see Getting Started on the chromedriver website.
Fun Fact
You can skip this step and still see Robot in action with CumulusCI. The tests will fail, but you can still see what it’s like to run a test, and the output that it produces.
You Get a Test! And You Get a Test!
When you initialize a repository to work with CumulusCI (see Start a
new CumulusCI
Project),
you automatically get a preconfigured robot task to run all of your
Robot tests at the same time. We also install one example test,
create_contact.robot, that shows how to write both browser-based and
API-based tests. In fact, we’ve gone ahead and created a complete
folder hierarchy for tests, test results, and everything else related to
Robot, all starting in a folder named robot at the top of your
repository.
<ProjectName>
├── robot
│   └── <ProjectName>
│       ├── doc
│       ├── resources
│       └── tests
│           └── create_contact.robot
Note
The create_contact.robot file is in plain text, so you can open it
with any text editor you have on your machine. One of the features we
love about Robot is that the files are not in a proprietary format.
Run Your First Test
You can run all tests for a project with a simple command line. In case you don’t have a default org defined, we’ll include instructions on which scratch org to use.
$ cci task run robot --org dev
If all goes well, the browser pops up, navigates around a bit, and then closes. The output on your screen looks something like this, though you might see additional information about creating the scratch org.
$ cci task run robot --org dev
2021-08-04 16:28:32: Getting org info from Salesforce CLI for test-yeqqkbxks2ny@example.com
2021-08-04 16:28:35: Beginning task: Robot
2021-08-04 16:28:35: As user: test-yeqqkbxks2ny@example.com
2021-08-04 16:28:35: In org: 00D0R000000Tz56
2021-08-04 16:28:35:
==============================================================================
Tests
==============================================================================
Tests.Create Contact
==============================================================================
Via API                                                               | PASS |
------------------------------------------------------------------------------
Via UI                                                                | PASS |
------------------------------------------------------------------------------
Tests.Create Contact                                                  | PASS |
2 tests, 2 passed, 0 failed
==============================================================================
Tests                                                                 | PASS |
2 tests, 2 passed, 0 failed
==============================================================================
Output:  /projects/<ProjectName>/robot/<ProjectName>/results/output.xml
Log:     /projects/<ProjectName>/robot/<ProjectName>/results/log.html
Report:  /projects/<ProjectName>/robot/<ProjectName>/results/report.html
Notice the three lines at the end that point to an XML file and two HTML
files. These paths will be different on your machine and reflect the
path to your repository. All Robot results go into the
robot/<ProjectName>/results folder. These files are overwritten each
time you run your Robot tests.
Robot places all of the test results in output.xml, and then generates
log.html and report.html, which contain two different human-readable
views of the results. log.html is more developer-friendly and contains
debugging information. report.html is a high-level report of successes
and failures.
View Log and Report Files
You can open these files in a browser with the open command.
$ open robot/<ProjectName>/results/log.html
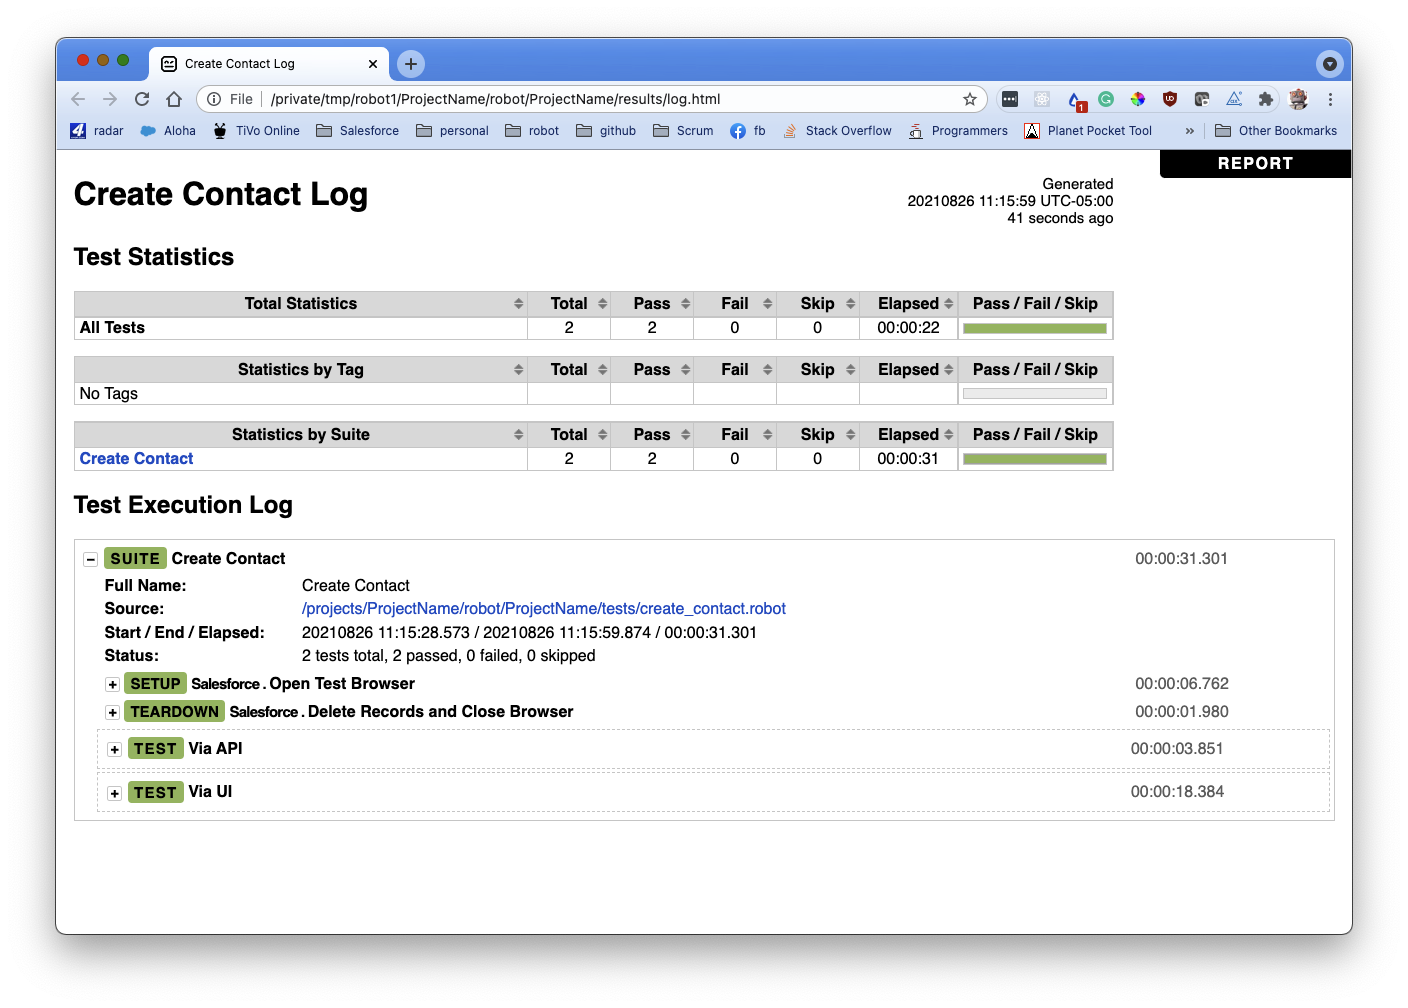
Feel free to open output.xml or report.html if you’re curious. In
our experience, log.html is the most useful for humans, and it’s the
one we use when reporting test results.
Want to learn more? The next section goes into more detail about why we love Robot Framework, and how you can write your own tests.
So Why Robot?
Robot is a
keyword-driven
acceptance testing framework, which means that users can write test
cases in an intuitive, human-readable language made up of high-level,
reusable keywords (Open test browser,
Delete records and close browser) rather than in a programming
language.
For example, this basic Robot test case file creates a new Contact
record, and then examines the record to confirm that the fields listed
are correct. You can see how straightforward the keyword syntax is. Even
someone brand new to test automation can grasp the function of the
Salesforce Insert, Salesforce Get, and Should be equal keywords.
*** Settings ***
Resource        cumulusci/robotframework/Salesforce.robot
Documentation   A simple Robot test

*** Test Cases ***
Create a Contact using the API

   ## Create a new Contact
   ${contact id}=   Salesforce Insert  Contact
   ...  FirstName=Eleanor
   ...  LastName=Rigby

   ## Get the new Contact and examine it
   &{contact}=      Salesforce Get  Contact  ${contact id}
   Should be equal  ${contact}[FirstName]    Eleanor
   Should be equal  ${contact}[LastName]     Rigby
The Robot Framework Advantage
Acceptance testing touches on multiple aspects of an application such as the data model, custom APIs, performance, and the user experience in the browser. Existing tools like Apex and Jest are good for writing unit tests and low-level integration tests. However, it can be difficult to understand the intent of a test, and the features being tested, when the test itself involves multiple lines of code detailing where to fetch data from, and how, and other such implementation details.
Robot addresses these challenges with a few strategies, helping you write high-level acceptance tests for every aspect of an application, often in a single test suite.
Human-readable, domain-specific test cases: Robot lets you create a language tailored to the domain of testing Salesforce applications (a domain-specific language, or DSL). The DSL consists of reusable keywords that present a complex set of instructions in a human-readable language. The result? Test cases that all project stakeholders can easily understand, such as a product manager, scrum master, documentation teams, and so on–not just the test authors. In the previous example,
Salesforce Insert,Salesforce GetandShould be equalare all keywords.Keyword libraries: Robot organizes keywords into libraries, which provide a simple, effective method to organize and share keywords between tests and projects. CumulusCI comes with a comprehensive standard library of Robot keywords created specifically to anticipate the needs of Salesforce testers. In the previous example, when you define
Salesforce.robotas a resource, it automatically pulls in dozens of Salesforce-specific keywords.Streamlined test cases: Keywords allow implementation details to be handled by the test but not explicitly itemized in the test. In the previous example, a new
Contactrecord is created with theSalesforce Insertkeyword, but we don’t see all the steps required to make an API call to create the record, such as getting an access token, creating an API payload, making the API call, and parsing the results. We see only two keywords that communicate with Salesforce via an API: one to create theContactrecord, and another to retrieve the new record to confirm it has the correct first and last names.
Robot-specific Tasks
CumulusCI integrates with Robot via custom tasks, such as:
robot: Runs one or more Robot tests. This task is the most common.robot_libdoc: Runs the libdoc command, which creates an HTML file defining all the keywords in a library or resource file.robot_testdoc: Runs the testdoc command, which creates an HTML file documenting all the tests in a test suite.
Like with any CumulusCI task, you can get documentation and a list of
arguments with the cci task info command. For example,
cci task info robot displays documentation for the robot task.
Custom Keywords
CumulusCI provides a set of keywords unique to both Salesforce and CumulusCI for acceptance testing. These keywords can run other tasks, interact with Salesforce applications, call Salesforce APIs, and so on. For a list of all custom keywords provided by CumulusCI, see Keywords.html.
Tip
In addition to the keywords that come with CumulusCI, you can write project-specific keywords that are either based on existing keywords, or implemented in Python.
Write a Sample Robot Test Case
Now that you have a general understanding of why Robot is ideal for
acceptance testing with CumulusCI, let’s construct a test case file
that creates a new Contact record.
Run
cci project init, which creates thecreate_contact.robottest case file that comes standard whenever you initialize a project with CumulusCI.In the
robot/<ProjectName>/testsfolder, save this code in a new file namednew_contact_record.robot.
*** Settings ***
Resource        cumulusci/robotframework/Salesforce.robot
Documentation   A simple Robot test

*** Test Cases ***
Create a Contact using the API

   ## Create a new Contact
   ${contact id}=   Salesforce Insert  Contact
   ...  FirstName=Eleanor
   ...  LastName=Rigby

   ## Get the new Contact and examine it
   &{contact}=      Salesforce Get  Contact  ${contact id}
   Should be equal  ${contact}[FirstName]    Eleanor
   Should be equal  ${contact}[LastName]     Rigby
You can tell that both create_contact.robot and
new_contact_record.robot are test case files because each one has a
.robot extension and contains a Test Cases section. The
new_contact_record.robot test case file is a simplified version of
create_contact.robot. We feature it in this documentation for simpler
code samples.
Syntax
Here’s a quick primer on the syntax in the new_contact_record.robot
test case file.
Symbol |
Name |
Description and Usage |
|---|---|---|
|
Section Heading |
A line that begins with one or more asterisks is a section heading. By |
# |
Hash |
Designates code comments. |
${} |
Variable |
Curly braces surrounding a name designate a variable. The lead |
= |
Assignment |
Equals sign is optional yet convenient for showing that a variable is |
… |
Ellipses |
Ellipses designate the continuation of a single-line row of code split |
Space |
Two or more spaces separate arguments from the keywords, and arguments |
For more details on Robot syntax, visit the official Robot syntax documentation.
Tip
For users interested in linting their Robot Framework code, we recommend checking out +robotframework-robocop. It’s a static code analysis tool for Robot Framework that can help maintain good code quality.
Settings
The Settings section of the .robot file sets up the entire test
suite. Configurations established under Settings affect all test
cases, such as:
Suite SetupandSuite Teardown, which support processes before the test begins and cleanup after the test finishes.Documentation, which describes the purpose of the test suite.Tags, which lets a user associate individual test cases with a label.Resource, which imports keywords from external files.
For example, these are the settings stored in the
new_contact_record.robot file.
*** Settings ***
Resource        cumulusci/robotframework/Salesforce.robot
Documentation   A simple Robot test
The cumulusci/robotframework/Salesforce.robot resource file comes with
CumulusCI and automatically inherits useful configuration and keywords
for Salesforce testing. The Salesforce.robot resource file is the
primary method of importing all keywords and variables provided by
CumulusCI, so it’s best practice for the file to be the first item
imported as a Resource under Settings. It also imports the
CumulusCI
Library,
the Salesforce
Library,
the third-party
SeleniumLibrary
for browser testing via Selenium, and these most commonly used Robot
libraries.
CumulusCI also comes bundled with these third-party keyword libraries, which must be explicitly imported by any test suite that needs them.
RequestsLibrary for testing REST APIs. To use
RequestsLibrary, explicitly import it under theSettingssection of your Robot test.All other libraries listed in the Standard tab of the Robot libraries documentation.
Test Cases
In the Test Cases section of the .robot file, each test case gets
its own code block; the test case name is the first line of code, with
no indentation. The body of the test case is all the indented text
underneath.
For example, here is the Test Cases section of the
new_contact_record.robot test case file. It has a single test case
named Create a Contact using the API.
*** Test Cases ***
Create a Contact using the API

   ## Create a new Contact
   ${contact id}=   Salesforce Insert  Contact
   ...  FirstName=Eleanor
   ...  LastName=Rigby

   ## Get the new Contact and examine it
   &{contact}=      Salesforce Get  Contact  ${contact id}
   Should be equal  ${contact}[FirstName]    Eleanor
   Should be equal  ${contact}[LastName]     Rigby
Notice these keywords used in the test case.
Salesforce Insertcreates a newContactrecord with the arguments it’s given for theFirstNameandLastNamefields.Salesforce Getretrieves the requestedContactrecord based on its ID.Should Be Equalcompares the arguments to the values of theFirstNameandLastNamefields of the newly createdContactrecord.
Tip
Keywords in the test cases are separated from arguments by two or more spaces.
Suite Setup and Teardown
Most real-world tests require setup before the test begins (such as opening a browser or creating test data), and cleanup after the test finishes (such as closing the browser or deleting test data). Robot supports setup and teardown at both the suite level (such as opening the browser before the first test, and closing the browser after the last test) and the test level (such as opening and closing the browser at the start and the end of the test).
If you run the new_contact_record.robot test case file several times,
you add a new Contact record to your scratch org each time it runs. If
you have a test that requires a specific number of Contact records,
the test can fail the second time you run it. To maintain the required
record count, you can add a teardown that deletes any Contact records
created by running the test.
Let’s modify the new_contact_record.robot test case file with a
Suite Teardown that deletes the Contact records created by any tests
in the suite.
*** Settings ***
Resource        cumulusci/robotframework/Salesforce.robot
Documentation   A simple Robot test
Suite Teardown  Delete session records

*** Test Cases ***
Create a Contact using the API

   ## Create a new Contact
   ${contact id}=   Salesforce Insert  Contact
   ...  FirstName=Eleanor
   ...  LastName=Rigby

   ## Get the new Contact and examine it
   &{contact}=      Salesforce Get  Contact  ${contact id}
   Should be equal  ${contact}[FirstName]    Eleanor
   Should be equal  ${contact}[LastName]     Rigby
Note
The Salesforce Insert keyword keeps track of the record IDs created.
The Delete session records keyword deletes those records.
To run this test from the command line:
$ cci task run robot --suites robot/<ProjectName>/tests/new_contact_record.robot
Generate Fake Data with Faker
The get fake data keyword comes with the Faker library that’s
installed with CumulusCI, and saves you from hard-coding test data for
Robot tests. Get fake data does much more than just return random
strings; it generates strings in an appropriate format. You can ask it
for a name, address, date, phone number, credit card number, and so on,
and get back properly formatted data.
For example, let’s modify the new_contact_record.robot test case file
to generate a fake name. Because the new Contact name is randomly
generated in this updated example, you can’t hard-code an assertion on
the name of the created Contact to verify the name. Instead, for
illustrative purposes, this test logs the Contact name in the test’s
log.html file.
*** Settings ***
Resource        cumulusci/robotframework/Salesforce.robot
Documentation   A simple Robot test
Suite Teardown  Delete session records

*** Test Cases ***
Create a Contact with a generated name
   [Teardown]       Delete session records

   ## Generate a name to use for Contact
   ${first name}=   Get fake data  first_name
   ${last name}=    Get fake data  last_name

   ## Create a new Contact
   ${contact id}=   Salesforce Insert  Contact
   ...  FirstName=${first name}
   ...  LastName=${last name}

   ## Get the new Contact and add name to the log
   &{contact}=      Salesforce Get  Contact  ${contact id}
   Log  Contact name: ${contact}[Name]
To run this test from the command line:
$ cci task run robot --suites robot/<ProjectName>/tests/new_contact_record.robot
Create Custom Keywords
We mentioned earlier that Robot makes use of a domain-specific language. By creating a collection of reusable custom keywords, we can create this DSL for testing Salesforce apps.
Let’s create a new Robot test that includes a custom keyword called
Create a test Contact, which creates a Contact record and then saves
the data for this record in a test variable. Save this code in a file
named custom_keyword.robot in the tests folder of your project’s
repository.
*** Settings ***
Resource        cumulusci/robotframework/Salesforce.robot
Suite Teardown  Delete session records

*** Test Cases ***
Example of using a custom keyword in a setup step
   [Setup]      Create a test Contact

   ## Get the new Contact that's stored in a test variable,
   ## and add the name to the log
   Log  New Contact: ${new contact}[Name]

*** Keywords ***
Create a test Contact
   [Documentation]  Create a temporary Contact and return it

   ## Generate a name to use for Contact
   ${first name}=   Get fake data  first_name
   ${last name}=    Get fake data  last_name

   ## Create a new Contact
   ${contact id}=   Salesforce Insert  Contact
   ...  FirstName=${first name}
   ...  LastName=${last name}

   ## Fetch the Contact object to be returned and save
   ## it to a test variable
   &{new contact}=    Salesforce Get    Contact    ${contact_id}
   Set test variable  &{new contact}
Because the Contact record was created inside the
Create a test Contact keyword, the &{new contact} variable is not
going to be visible to any test case or keyword that calls the
Create a test Contact keyword. It’s only when we use the built-in
keyword Set test
variable
that the newly created &{new contact} variable becomes visible in the
Example of using a custom keyword in a setup step test case.
You can create settings for individual test cases and keywords by specifying the setting names in square brackets. These settings are often used to override setting defaults in the Setting section. In the previous example:
[Setup]is a setting for theExample of using a custom keyword in a setup steptest case.[Documentation]is a setting for theCreate a test Contactkeyword.
For details, see the Settings in the Test Case section in the official Robot Framework documentation.
To run this test from the command line:
$ cci task run robot --suites robot/<ProjectName>/tests/custom_keyword.robot
Create a Resource File
Now that you know how to create a reusable custom keyword in a test case file, you can build a library of custom keywords to be shared project-wide with a resource file.
A resource file is similar to a test case file, except it can’t contain test cases. Typically, a resource file stores settings that are used by every test in the project, such as defining project-specific variables, or importing project-specific keyword libraries and resource files.
Let’s create a resource file that stores the Create a test Contact
custom keyword, which is currently in the custom_keyword.robot test
case file defined in Create Custom Keywords.
There aren’t any requirements for naming resource files. However, most
teams have standardized creating a resource file named after the
project, such as NPSP.robot for NPSP.
For this example, we’ll stick to this convention and create a file
named after your project. Save this code in a file named
robot/<ProjectName>/resources/<ProjectName>.robot.
*** Settings ***
Resource        cumulusci/robotframework/Salesforce.robot

*** Test Cases ***
Create a test Contact
   [Documentation]  Create a temporary Contact and return it

   ## Generate a name to use for Contact
   ${first name}=   Get fake data  first_name
   ${last name}=    Get fake data  last_name

   ## Create a new Contact
   ${contact id}=   Salesforce Insert  Contact
   ...  FirstName=${first name}
   ...  LastName=${last name}

   ## Fetch the Contact object to be returned and save
   ## it to a test variable
   &{new contact}=    Salesforce Get   Contact    ${contact_id}
   Set test variable  &{new contact}
Note
Along with moving the Keywords section in the custom_keyword.robot
test case file to this file, you must also import Salesforce.robot as
a Resource because that’s where the Faker library is defined.
Next, let’s modify the custom_keyword.robot test case file. Remove
the Keywords section, and then under Settings, add as many
Resource statements as needed to import keywords from their specific
.robot resource files.
*** Settings ***
Resource        cumulusci/robotframework/Salesforce.robot
Resource        <ProjectName>/resources/<ProjectName>.robot

Suite Teardown  Delete session records

*** Test Cases ***
Example of using a custom keyword in a setup step
   [Setup]      Create a test Contact

   ## Get the new Contact that's stored in a test variable,
   ## and add the name to the log
   Log  New Contact: ${new contact}[Name]
Note
Keywords defined in resource files are accessible to all tests in a suite that imports the resource files.
Create a Simple Browser Test
Now that you know how to create records using the API, you can use those records in a browser test.
Let’s create a Robot test that uses Suite Setup to call the
Open test browser keyword. Save this code in a file named ui.robot
in the tests folder of your project’s repository.
*** Settings ***
Resource        cumulusci/robotframework/Salesforce.robot

Suite Setup     Open test browser
Suite Teardown  Delete records and close browser

*** Test Cases ***
Take screenshot of landing page
   Wait until page contains  Most Recently Used
   Capture page screenshot
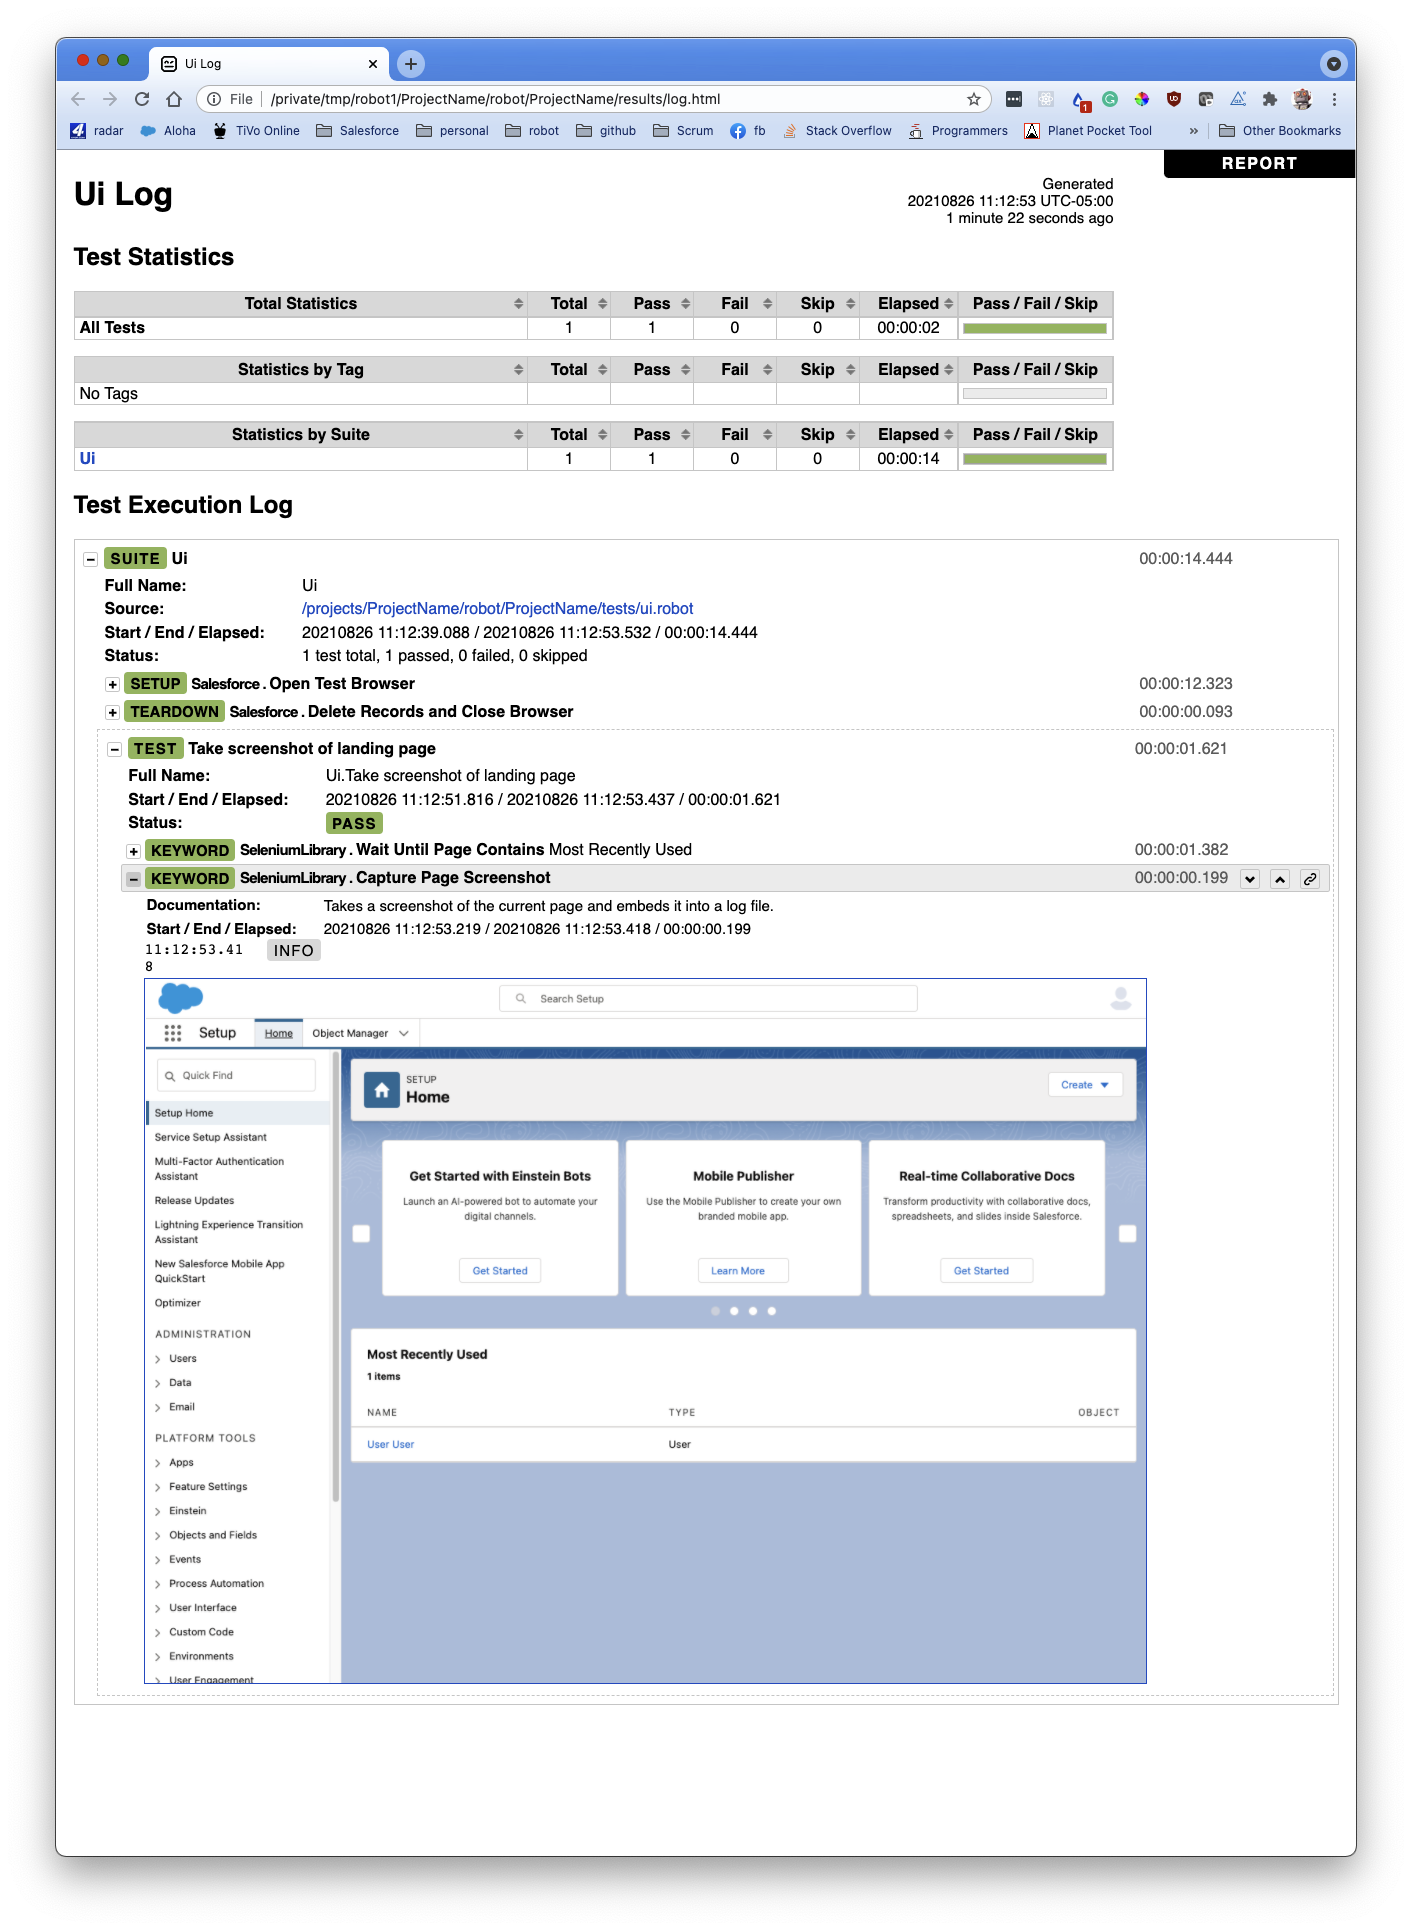
Because this test case file calls Open test browser, a browser window
appears while the test runs. The test case takes a screenshot, which can
be a useful tool when debugging tests (a tool used sparingly because
screenshots can take up a lot of disk space). Suite Teardown then
calls the Delete records and close browser keyword to complete the
test.
Note
Open test browser doesn’t always wait long enough for Salesforce to
render. That’s why the Wait until page contains keyword comes in
handy. It waits until the “Most Recently Used” section of the web page
appears, which is a good indication that the site has loaded.
To run this test from the command line:
$ cci task run robot --suites robot/<ProjectName>/tests/ui.robot
In addition to the usual output files (log.html, report.html,
output.xml), this test also creates a screenshot in the results
folder. If you open log.html, you can see whether each step of the
test case passed or failed. Toggle the + tab of the
Take screenshot of landing page test header to examine the results of
the test. Then toggle the + tab of the Capture page screenshot
keyword to examine the screenshot taken of the landing page.
Open the Browser
The Selenium library comes with a keyword for opening the browser.
However, CumulusCI comes with its own keyword, Open Test
Browser,
which not only opens the browser but also takes care of the details of
logging into the org. This keyword uses a variable named ${BROWSER},
which can be set from the command line or in the cumulusci.yml file to
specify which browser to use.
Specify variables in the cumulusci.yml file or in the vars option
under robot in the tasks section. For example, ${BROWSER} defaults
to chrome in Robot, but it can be set to firefox.
tasks:
   robot:
      options:
      vars:
         - BROWSER:firefox
To set the browser to firefox from the command line for a single test
run:
$ cci task run robot --vars BROWSER:firefox
Supported Browsers
The robot task supports both Chrome and Firefox browsers, and the
headless variations of these browsers, headlesschrome and
headlessfirefox. With the headless version, browser tests run without
opening a browser window. The tests still use a browser, but you can’t
see it while the test runs. This variation is most useful when you run a
test on a continuous integration server like MetaCI, where a physical
display isn’t connected to the server.
To specify the headless version of a browser, prepend headless to the
browser name. For example, the command line option to specify headless
Chrome is --var BROWSER:headlesschrome.
Tip
When you run a test in headless mode, you can still capture screenshots
of the browser window. The Capture Page Screenshot keyword is
indispensable for debugging tests that failed in headless mode.
Combine API Keywords and Browser Tests
In Robot, API and browser keywords can be used together to build more elaborate acceptance tests.
Let’s build on the original new_contact_record.robot test to
integrate the previous configurations covered so far. Replace the
entirety of the new_contact_record.robot test case file in the tests
folder of your project’s repository with this code.
*** Settings ***
Resource        cumulusci/robotframework/Salesforce.robot
Documentation   A simple Robot test

Suite Setup     Open test browser
Suite Teardown  Delete records and close browser

*** Test Cases ***
Take screenshot of list of Contacts
   [Setup]  Create a test Contact

   Go to object home  Contact
   Capture page screenshot

*** Keywords ***
Create a test Contact
   [Documentation]  Create a temporary Contact and return the ID
   [Return]         ${contact id}

   ## Generate a name to use for Contact
   ${first name}=   Get fake data  first_name
   ${last name}=    Get fake data  last_name

   ## Create a new Contact
   ${contact id}=   Salesforce Insert  Contact
   ...  FirstName=${first name}
   ...  LastName=${last name}
The new_contact_record.robot test case file not only creates a
Contact record, it also opens the browser to see that the Contact
record appears in a list of Contacts, takes a screenshot of the list,
then deletes all new records created during the test run, and closes the
browser.
To run this test from the command line:
$ cci task run robot --suites robot/<ProjectName>/tests/new_contact_record.robot --org dev
Run an Entire Test Suite
At this point, the robot folder in your project repository should look
like this.
<ProjectName>
├── robot
│   └── <ProjectName>
│       ├── doc
│       ├── resources
│       │   └── <ProjectName>.robot
│       ├── results
│       │   ├── log.html
│       │   ├── output.xml
│       │   ├── report.html
│       │   ├── selenium-screenshot-1.png
│       │   └── selenium-screenshot-2.png
│       └── tests
│           ├── create_contact.robot
│           ├── custom_keyword.robot
│           ├── new_contact_record.robot
│           └── ui.robot
While a single .robot file is considered to be a test suite, Robot
also considers folders to be suites. You can pass a folder to Robot to
run all tests stored in that folder. So if you’ve saved the
new_contact_record.robot, custom_keyword.robot, and ui.robot test
case files in the tests folder, you can run all of the tests in the
command line.
$ cci task run robot --suites robot/<ProjectName>/tests --org dev
In the output, you can see that all of the test case files in the
tests folder have been run, including the create_contact.robot test
case file that comes with CumulusCI.
$ cci task run robot --suites robot/<ProjectName>/tests --org dev
2021-08-24 16:45:36: Getting org info from Salesforce CLI for test-4g5sxdzt9sj3@example.com
2021-08-24 16:45:39: Beginning task: Robot
2021-08-24 16:45:39: As user: test-4g5sxdzt9sj3@example.com
2021-08-24 16:45:39: In org: 00D56000000KC1g
2021-08-24 16:45:39:
==============================================================================
Tests
==============================================================================
Tests.Create Contact
==============================================================================
Via API                                                               | PASS |
------------------------------------------------------------------------------
Via UI                                                                | PASS |
------------------------------------------------------------------------------
Tests.Create Contact                                                  | PASS |
2 tests, 2 passed, 0 failed
==============================================================================
Tests.Custom Keyword
==============================================================================
Example of using a custom keyword in a setup step                     | PASS |
------------------------------------------------------------------------------
Tests.Custom Keyword                                                  | PASS |
1 test, 1 passed, 0 failed
==============================================================================
Tests.New Contact Record :: A simple Robot test
==============================================================================
Take screenshot of list of Contacts                                   | PASS |
------------------------------------------------------------------------------
Tests.New Contact Record :: A simple Robot test                       | PASS |
1 test, 1 passed, 0 failed
==============================================================================
Tests.Ui :: A simple Robot test
==============================================================================
Take screenshot of list of Contacts                                   | PASS |
------------------------------------------------------------------------------
Tests.Ui :: A simple Robot test                                       | PASS |
1 test, 1 passed, 0 failed
==============================================================================
Tests                                                                 | PASS |
5 tests, 5 passed, 0 failed
==============================================================================
Output:  /projects/<ProjectName>/robot/<ProjectName>/results/output.xml
Log:     /projects/<ProjectName>/robot/<ProjectName>/results/log.html
Report:  /projects/<ProjectName>/robot/<ProjectName>/results/report.html
Tip
Test suite folders can also contain nested folders of tests, which makes
it easy to organize tests into functional groups. For example, you can
store all API tests in a tests/api folder, and store all UI tests in a
tests/ui folder.
Because running everything in the tests folder is such common
practice, it’s the default behavior for the robot task.
To run an entire suite of tests with the robot task:
$ cci task run robot --org dev
Learn More About Robot Framework
To learn more about Robot, visit the Robot Framework User Guide. We also have these resources in the CumulusCI documentation.